Calculating how many tiles you need for home needn’t be a difficult task! Use our handy tile calculator below to find out how many tiles you need. For any other tile related queries, don’t hesitate to get in touch with our tile experts.
Use our handy calculator to help work out how many tiles you'll need for your project. Or read the guide below to help working out the measurements.
Your home. Our passion
Calculating how many tiles you need for home needn’t be a difficult task! Use our handy tile calculator below to find out how many tiles you need. For any other tile related queries, don’t hesitate to get in touch with our tile experts.
For a standard square floor using say 600 x 300mm tiles laid in a lineal pattern, measure the length of the room, and divide that by the length of the tile.
For example:- if the room is 4400mm long divide it by the length of the tile 600mm = 7.33 tiles, whatever the answer is round the calculation up to the next full tile, in this example 8 to allow sufficient tiles for offcuts.
To set out the room, divide it equally in half, marking a line at 2200mm across the room, this will give you the same size cut against each wall. This centre line will either be the centre or the edge of the tile for your setting out, leaving you with a small or larger cut to the wall. It always looks better with a larger cut and is easier to do. If you are laying the tiles in a brick effect, then the centre line will be at both the edge of the tile on one run, and the centre of the tile on the next run of tiles.
Repeat the above for the width of the room.
For example:- if the room is 2600mm wide, divide by the tile width 300mm = 8.66 tiles, so round this up to 9 tiles. To get the total number of tiles for the floor, multiply the number of tiles for the length with the tiles for the width, 8 x 9 = 72 tiles required to do the job.
Allow 10% for Breakages and Offcuts
The calculations above allows for offcuts, but not breakages, so always allow a small amount extra, even if they don’t get used. A 10% extra is usually enough to cover both breakages and offcuts – that way you have a few spare tiles that are from the same batch to keep in case of accidents or damage in the future.
1.Before you calculate the number of tiles you need to tile your bathroom, you need to set it out correctly to ensure that it not only looks amazing, but also that you will not create problems for yourself like leaks.
2. Start setting out by working out where to start vertically, you do this by drawing a level line of all the obstacles in the room eg: the top of door frame, window cill and head of window, the height of bath or shower tray etc, then draw a level line from all these points to meet one vertical line that is easy for you to work from. Because a bathroom normally has so many things to consider it is well worth spending more time getting this part right, so you know what size cuts that you will end up with at all points in the bathroom before you even start tiling.
3. Lay a line of your tiles on the floor using the correct tile spacers, this will give you something to visualise how your cuts will work out by measuring your line of tiles then placing your measure against the vertical line of marks that you have drawn on the wall.
4. You may find a good place to start tiling is from the bath or shower tray if it is level, or at least a large cut if it doesn’t work well for the other cuts. Always have as large a cut or whole tile if possible against wet areas like baths or showers, because a small cut of tile only has a small amount of adhesive to hold it in place, so could cause problems like leaks.
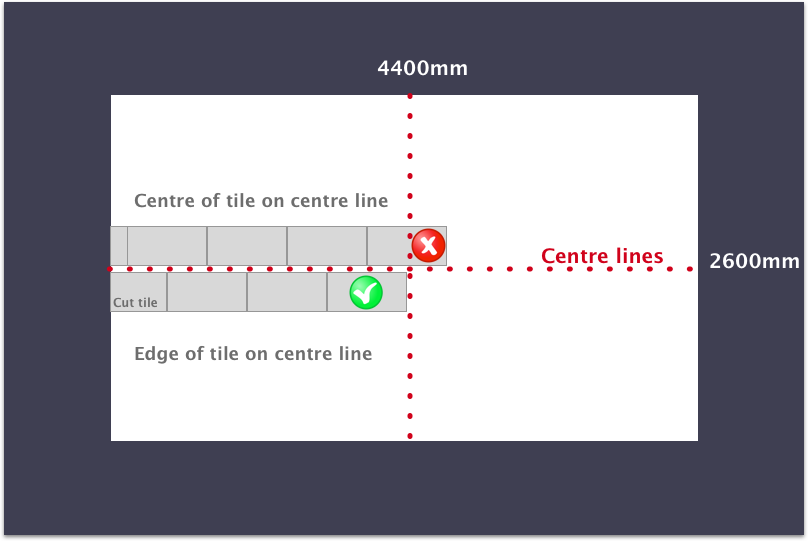
5. For example if you think the bath is level and would be a good place to start, measure up and down from the bath height on your vertical line that you have marked on the wall to see where each tile falls in relation to all the other level marks avoiding small tile cuts as much as possible, remember to include the floor and ceiling, assuming that you have checked how level they are.
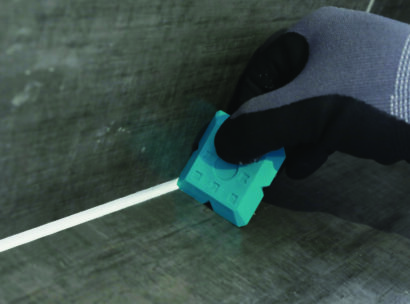
6. Once you have determined the right place to start, you can then draw a level line all around the room ensuring the line meets at the other side.
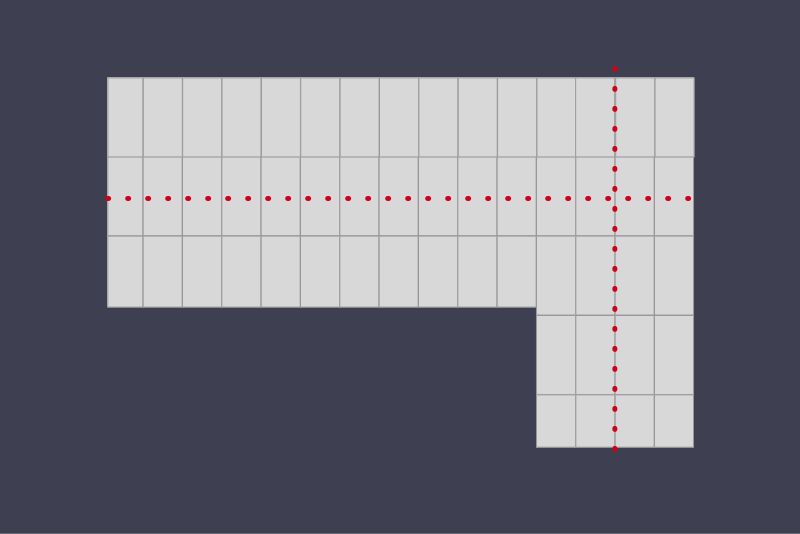
7. Now you can calculate the number of tiles required using the same method as floor tiles, measure the height of the wall and divide by the height of the tile, then round it up to the next whole tile, then the width of the wall divided by the width of the tile, again rounded up to a whole tile, then multiply the two together to figure out how many tiles you need for that one wall.
8. Do the same for each wall individually, then add them all together at the end.
Top tip – For a wall with a door in it, break this down to separate pieces, to the left of the door, to the right, and above the door. For a window wall, depending on window size and depth of the reveals/ window cill etc, think of this as the lid of a cardboard box folded inwards, if you were to unfold them, you would cover most of the hole, so best to measure the complete wall.
For an L shaped floor, find the centre line of each part of the L shape, and where the lines cross, this will be the starting point, as above either with the centre, or the edge of the tile could start on this line depending if you have a small or large cut to the wall.
Use the same way of calculating as in the diagram, remembering that if you are using a rectangular tile, that in one direction of the L shape, the tile will be laid length ways, and the other part of the L shape it will be laid width ways, so think about which way will look best before starting, this would usually be with the tile length being laid with the longest part of the L.
New Image stocks a wide range of high-quality tiles to suit a variety of interior and exterior tiling projects, such as kitchens, bathrooms, en-suites, wetrooms, conservatories, hallways, entranceways, patios and more.
BROWSEExplore our diverse selection of tile accessories, including adhesive and grout, all of which are available to conveniently order online.
BROWSEOver the last 30+ years, New Image Tiles, Kitchens and Bathrooms have made strong bonds with the best local tilers in Dorset. Browse our top recommended tilers in Dorset.
BROWSE